Azure Index
Azure Meta
Azure CLI
Azure Naming Strategy
Azure Functions
Azure Functions - Introduction
Azure Functions - Fundamentals
CosmosDB
Azure AD B2C
Azure AD B2C
Azure AD B2C - Personal Notes
Azure AD B2C - JWK
Azure CLI
Azure Naming Strategy
Azure Functions - Introduction
Azure Functions - Fundamentals
Azure AD B2C
Azure AD B2C - Personal Notes
Azure AD B2C - JWK
(gráfico obtenido de la referencia para visualizar como se organizan los recursos en azure)
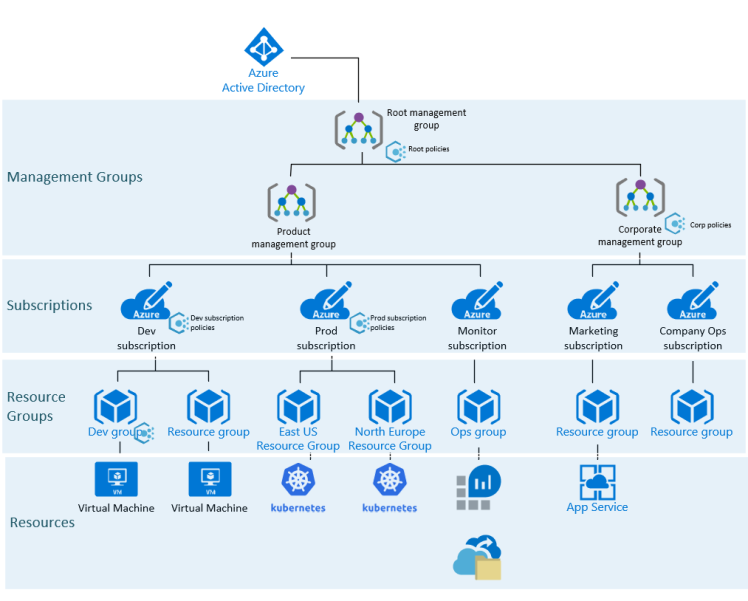
Los resource groups son como directorios. Se les puede asignar múltiples a cada recurso.
La estrategia para los nombres que yo utilizo que y mejor me sirve a la hora de buscar y entender recursos es:
resource type - app name - region - env - counter
ejemplo:
azurefunction-spotiguard-spainwest-dev-01
Organize Azure resources using management group, tags, naming convention – AzureDays
log into/out of tenant
az login
az logout
see & select accounts
#ver subscripcion seleccionada
az account show

# ver todas subscripciones disponibles
az account list

# seleccionar suscripcion
az account set --subscription {id}
see & manage resource-groups
az group list
az group delete --name {name}
Se me ha quedado un backup atascado que no me dejaba borrarlo por la web. Con CLI hay que desregistrarlo y luego ya se puede borrar
# we should be able to see the resource
az backup container list -g learn-with-ai -v vault-xx00xxxx --backup-management-type AzureStorage

# unregister
az backup container unregister -g learn-with-ai -v vault-xx00xxxx --backup-management-type AzureStorage
In Azure AD B2C you’ve two ways to provide identity UX:
For the most common identity tasks. Things like:
They’re config files that define the behaviour of your Azure AD B2C tenant UX. They can be fully edited by an identity developer to complete many different tasks.
It’s fully configurable and policy-driven.
Each user journey is defined by a policy. You can build as many or as few policies as you need.
Defined by several XML files that refer to each other in a hierarchical chain.
The starter pack comes with pre-built policies.
Each starter pack includes:
A claim provides temporary storage of data during an Azure AD B2C policy execution. It can store info about the user, such as first name, last name… or any other claim obtainer from the user or other systems. The claim schema is the place where you declare your claims.
When a policy runs, B2C sends and receives claims to and from internal and external parties, then sends a subset of these claims to your relying party app as part of the token.
Claims transformation are predefined functions to convert a given claim into another one, evaluate a claim or set a claim value.
They allow you to define business logic with path through which users will follow to gain access to your application. The user is taken through this journey to retrieve the claims that are to be presented to your app.
A user journey is built from a sequence of orchestration steps.
How you can add orchestration steps to social and local account starter pack.
A user must reach the last step to acquire a token. Orchestration steps can be conditionally executed based on preconditions. After an step completes, B2C stores the outputted claims in the claims bag. This bag can be used by any further orchestration steps in the user’s journey.
https://docs.microsoft.com/en-us/azure/active-directory-b2c/user-flow-overview
https://docs.microsoft.com/en-us/azure/active-directory-b2c/custom-policy-overview
JSON Web Key (JWK) represents a set of public keys as a JSON object. This format is used to represent bare keys.
The following is a key example:
{
  "jwk": [
    {
      "alg": "EC",
      "crv": "P-256",
      "x": "{x_value}",
      "y": "{y_value}",
      "use": "enc",
      "kid": "1"
    },
    {
      "alg": "RSA",
      "mod": "{mod_value}",
      "exp": "AQAB",
      "kid": "2011-04-29"
    }
  ]
}
It’s possible to go from PEM format to JWK and from JWK to PEM.
Azure AD B2C creates and validates user flows with keys. It automatically rotates them, but they’re created as JWK and not PEM.
To validate the JWT we need to:
As the documentation states the client needs to check periodically for new JWK keys, as they rotate them. A good period check is every 24 hours.
https://openid.net/specs/draft-jones-json-web-key-03.html#anchor1
https://stackoverflow.com/questions/50816301/msal-access-token-invalid-signature
https://docs.microsoft.com/es-es/azure/active-directory-b2c/tokens-overview
Azure AD B2C is Identity as a Service. It allows you to login into apps or use Twitter, Google or other authenticators. They can sign up or sign in. OpenID, OAuth, SAML.
Customers get to use their preferred accounts to sign up or create a regular user / pwd. You can customize the login experience.
This is best for the following types:
This doesn’t work together with Azure AD B2C.
Create new resource -> B2C -> Create new tenant -> enter general information
Notice for the initial domain name, the full domain will be *.onmicrosoft.com
Once a tenant is provisioned, click to manage it. A new tab opens, this is because the B2C tenant is separate from your Azure subscription’s tenant. Your Azure subscription has an Azure Active Directory Tenant associated with it and this new B2C one is distinct and separate. It’s its own directory.
Inside we have the following modules or tabs:
Before being able to use the B2C instance, you also have to link the B2C directory back to the main subscription. This makes it a service for you to use.
Create new resource -> Azure Active Directory B2C -> Create -> Link existing Azure AD B2C Tenant to my Azure subscription -> select the one you just created -> put it into a resource group
The flows are reusable. They controls when social accounts can be used to sign in.
The attributes to collect from the user. (you can collect standard or custom ones).
To use MFA or not.
User interface customization.
Information inside the token that’s returned from B2C.
It can be used across B2C apps. They’re entirely reusable.
Azure AD B2C Application - it’s not your web or API. It’s models apps that have authentication added. It makes sure only your users can sign-in.
Redirect URI - where to redirect response after the user’s been authenticated. As a test, put https://jwt.ms to see what’s inside the JWT token.
There’re 3 recommended to have, but you can create custom ones:
Everything that controls the journeys of the users is located under Policies.
Social network provider are called identity providers (IdP). In order to use them, you have to configure them first. You will get a key which you enter into B2C and the authentication will happen seamlessly.
A B2C app models the real world. Every real-world app needs a B2C app.
reply URL: URL where responses will be returned to your webapp.
App ID: unique ID that identifies your B2C app.
They obey standards like OAuth 2.0 or OpenID Connect.
When you want to interact with it, you specify your user flow.
Everything from Sign in to get Resource token happens inside Azure, not your app.
They’re the way that B2C uses to transmit claims about a user calling Apps. They’re all JWT tokens.
ID token: contains claims user to identify user. (e.g. user’s object ID in AD). You must always validate it. Access token: Claims used to identify API permissions. Validate it. Refresh token: It should be a black box to your app. Both others tokens expire.
How server-based apps authentication works with B2C. Underlying authentication protocol is OpenID Connect.
Individual steps into a user’s journey:
They’re XML files
have a Schema definition (which will be used to return the tokens)
Content definition - Things like how to render pages.
Technical profiles - they’re the endpoints and how to communicate with identity providers.
Orchestration - steps that are contained within the custom policies
In order to work with custom policies we’ll need to handle three files:
User flows and custom policies in Azure Active Directory B2C - Azure AD B2C | Microsoft Learn
Files that compose an Azure Function:
Create a resource -> Compute -> Function App.
The function name has to be unique.
Create new resource group.
You can choose the OS.
Storage:
Create a new recommended storage.
It offers to create an application insight instance for us. This stores logs and diagnostic information. This is really recommended.
On Configuration > Application settings you can create sys envs which will appear in your code.
There’s a storage explorer where you may see the contents for your function in real time.
There’re a lot of trigger types
Input / Output Bindings
To work with Azure Functions, you may work with Visual Studio. There’s an option to enable “Azure Development” with which you’ll be able to project and run your functions locally.
Azure Functions are based in serverless programming. They integrate easily with other Azure services. You provide Code to execute and an event that triggers it.
For example to run background tasks every hour.
They’re brilliant for:
Azure Functions is built on top of the web jobs SDK and it’s hosted on the app service platform.
With VM you can install whatever you want: web servers, services etc. This is known as IaaS (infrastructure as a service). You can choose OS and have complete control of the server, but you’re responsible for it: Patching, maintaining, scaling, operational overhead.
This are examples of queries to use for Azure CosmosDB, as this database uses a restricted version of SQL and it doesn’t allow all queries or joins.
To be used with the main, partial query. This query starts with something such as SELECT * FROM c
WHERE c.ts LIKE "%2022/03/10%"
ORDER BY c.ts DESC
WHERE c.type = "Writeable"
AND c.ts LIKE "%2022/03/10, 15:2%"
ORDER BY c.ts DESC
Normal SQL queries to be used as custom queries. Note that CosmosDB doesn’t support a 100% of all SQL statements.
(count number of entries)
SELECT COUNT(1) FROM c
	WHERE c.ts LIKE "%2022/03/10%"
	ORDER BY c.ts DESC